We moved to www.diy-my-home.com
To view this page and see the 4 things we would have changed with our concrete countertops please visit this page: http://diy-my-home.com/2010/09/concrete-countertop-hindsight/

We moved to www.diy-my-home.com
To view this page and see the 4 things we would have changed with our concrete countertops please visit this page: http://diy-my-home.com/2010/09/concrete-countertop-hindsight/
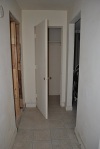
Weirdest part about this house was how closed off the kitchen was. You had to walk through a skinny hallway and tiny little doorway to get over into the dining/living ‘side’ of the house. But this was nothing that a few [thousand] swings of the sledgehammer couldn’t fix…thankfully Dave enlisted the strength of some of the athletes he trains for this part of the job since it was all that dreaded PLASTER and mesh! Anyone who has EVER dealt with a renovation of a home with plaster will feel our pain here.


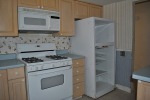


A fully functioning kitchen…that we HATED. It was very dark and closed in, had impossible to remove wallpaper backspash, old laminate countertops, rusty sink, dirty tile floor, and not terrible (but not our taste) cabinets.
1) Remove EVERYTHING. Everything! The day I saw this happen was a little scary. Opened up the space entirely by taking out a row of closets that separated the kitchen from the rest of the house. (We’ll find storage someplace else…i hope) and removed all cabinets, appliances, flooring, ceiling tray & soffet. switched the hook ups for stove/microwave with the dishwasher to allow more counterspace near the fridge. Also wired for under cabinet lights and drywalled over the crazy wallpaper to start fresh. (We didn’t DIY any of this crazy part).
2) Flooring went in: Our contractor installed beautiful solid bamboo flooring throughout the entire house alternating the seams (like laying subway pattern in tiles)…we like that rich color (even if it is nearly impossible to keep looking clean). They also built a half wall for our island bar top.
3) Cabinets: After MUCH research we opted for a company that was quite cheap (Aurora Line) but we did have to go pick them up and install them ourselves. And we somehow measured wrong and had to re-order 4 cabinets (those beauties have a lovely home installed in our garage now!). After Dave helped our contractor install the first round of cabinets he thought we could probably take in the task of installing the rest ourselves. And sure enough it wasn’t too difficult as long as you have a level and a boat load of shims. This project definitely grew our DIY egos a little bit LOL.
4) Next step was hardware/drawer pulls and toekick. I dragged my husband to his least favorite, and my favorite store: IKEA 🙂 We LOVE the long european handles and intended on putting them on the drawers too, but due to the construction of the drawers, this wouldn’t work (unless we wanted them to be off-center) so we found other pulls for the drawers there as well. IKEA was actually a final contender for our cabinet and appliance purchases as well but decided to go a different route to save just a little more. However, we still liked the look of the stainless steel toekick so we picked that up at IKEA as well! (we haven’t installed all of it yet though)
5) Next we picked up a sink, faucet & garbage disposal at our local Menards. We both really liked the granite composite sink that actually could be mounted above or under the countertop and was the color we were hoping to do the counters. We went for a cheap faucet w/ pullout sprayer (also can be installed w/ single or triple hole). We put temporary (plywood) counters on until we could make that decision and installed the sink temporarily.
6) The countertop decision: This was a tough one. We really needed to do this project on the cheap since we had spent our entire remodeling budget by this time (Doesn’t that always happen?!). So of course we figured we would be getting laminate. BUT we visited Menards and because we had a custom section and didn’t want a backsplash (which is extra?!) our quote came in at over $1,700!! This is when we really started looking into how to pour our own concrete countertops in place (since this would cost under $500)…and the rest is history! (read here for the Concrete Countertop Experiment DIY details)
7)The MUCH needed window treatments: We share a driveway (right outside our kitchen window) with our neighbors and to avoid any more awkward moments we ordered faux wood 2″ blinds in cherry color (without ordering a sample color since this was a rush) and thankfully look great on our windows! Got them custom sized from www.americanblinds.com. They came to about $75. The valance was all scuffed up when it arrived but they quickly shipped us a replacement.
8)The only piece of the puzzle left is the backsplash…and we have one in mind. Much to our surprise we found a mosaic mixed glass and stone backsplash at Menards that we actually love! It has gray, green, tan colors. We are going to attempt that project in the near future and share it with you when that happens.
THE END
What do you think? Did we do okay??
Using a concrete resurfacer was a success…a messy success! And the cats didn’t help with this kind of troublemaking:

Paw print..don't worry we fixed it
Last night Dave decided to resurface the island top (he did the bar top 2 nights ago which went smoothly). This time the mix was really wet and spilled over the edges ALL OVER the cabinets (which were not tarped this time since we had virtually no mess w/ the bar top). Fortunately it all wiped off perfectly…I was worried that the sand in the mix would scratch the cabinets as we wiped it off. Phew! Thankful for tough cabinet doors.
Check out the Resurfacing Page for pics of the process or the original concrete countertop page if you haven’t seen that yet.
